| <!--Copyright 2022 The HuggingFace Team. All rights reserved. |
|
|
| Licensed under the Apache License, Version 2.0 (the "License"); you may not use this file except in compliance with |
| the License. You may obtain a copy of the License at |
|
|
| http://www.apache.org/licenses/LICENSE-2.0 |
|
|
| Unless required by applicable law or agreed to in writing, software distributed under the License is distributed on |
| an "AS IS" BASIS, WITHOUT WARRANTIES OR CONDITIONS OF ANY KIND, either express or implied. See the License for the |
| specific language governing permissions and limitations under the License. |
|
|
| ⚠️ Note that this file is in Markdown but contain specific syntax for our doc-builder (similar to MDX) that may not be |
| rendered properly in your Markdown viewer. |
|
|
| --> |
|
|
| # Pipeline per l'inferenza |
|
|
| La [`pipeline`] rende semplice usare qualsiasi modello dal [Model Hub](https://huggingface.co/models) per fare inferenza su diversi compiti come generazione del testo, segmentazione di immagini e classificazione di audio. Anche se non hai esperienza con una modalità specifica o non comprendi bene il codice che alimenta i modelli, è comunque possibile utilizzarli con l'opzione [`pipeline`]! Questa esercitazione ti insegnerà a: |
|
|
| * Usare una [`pipeline`] per fare inferenza. |
| * Usare uno specifico tokenizer o modello. |
| * Usare una [`pipeline`] per compiti che riguardano audio e video. |
|
|
| <Tip> |
|
|
| Dai un'occhiata alla documentazione di [`pipeline`] per una lista completa dei compiti supportati. |
|
|
| </Tip> |
|
|
| ## Utilizzo della Pipeline |
|
|
| Nonostante ogni compito abbia una [`pipeline`] associata, è più semplice utilizzare l'astrazione generica della [`pipeline`] che contiene tutte quelle specifiche per ogni mansione. La [`pipeline`] carica automaticamente un modello predefinito e un tokenizer in grado di fare inferenza per il tuo compito. |
|
|
| 1. Inizia creando una [`pipeline`] e specificando il compito su cui fare inferenza: |
|
|
| ```py |
| >>> from transformers import pipeline |
| |
| >>> generator = pipeline(task="text-generation") |
| ``` |
|
|
| 2. Inserisci il testo in input nella [`pipeline`]: |
|
|
| ```py |
| >>> generator( |
| ... "Three Rings for the Elven-kings under the sky, Seven for the Dwarf-lords in their halls of stone" |
| ... ) # doctest: +SKIP |
| [{'generated_text': 'Three Rings for the Elven-kings under the sky, Seven for the Dwarf-lords in their halls of stone, Seven for the Iron-priests at the door to the east, and thirteen for the Lord Kings at the end of the mountain'}] |
| ``` |
|
|
| Se hai più di un input, inseriscilo in una lista: |
|
|
| ```py |
| >>> generator( |
| ... [ |
| ... "Three Rings for the Elven-kings under the sky, Seven for the Dwarf-lords in their halls of stone", |
| ... "Nine for Mortal Men, doomed to die, One for the Dark Lord on his dark throne", |
| ... ] |
| ... ) # doctest: +SKIP |
| ``` |
|
|
| Qualsiasi parametro addizionale per il tuo compito può essere incluso nella [`pipeline`]. La mansione `text-generation` ha un metodo [`~generation.GenerationMixin.generate`] con diversi parametri per controllare l'output. Ad esempio, se desideri generare più di un output, utilizza il parametro `num_return_sequences`: |
|
|
| ```py |
| >>> generator( |
| ... "Three Rings for the Elven-kings under the sky, Seven for the Dwarf-lords in their halls of stone", |
| ... num_return_sequences=2, |
| ... ) # doctest: +SKIP |
| ``` |
|
|
| ### Scegliere modello e tokenizer |
|
|
| La [`pipeline`] accetta qualsiasi modello dal [Model Hub](https://huggingface.co/models). Ci sono tag nel Model Hub che consentono di filtrare i modelli per attività. Una volta che avrai scelto il modello appropriato, caricalo usando la corrispondente classe `AutoModelFor` e [`AutoTokenizer`]. Ad esempio, carica la classe [`AutoModelForCausalLM`] per un compito di causal language modeling: |
|
|
| ```py |
| >>> from transformers import AutoTokenizer, AutoModelForCausalLM |
| |
| >>> tokenizer = AutoTokenizer.from_pretrained("distilbert/distilgpt2") |
| >>> model = AutoModelForCausalLM.from_pretrained("distilbert/distilgpt2") |
| ``` |
|
|
| Crea una [`pipeline`] per il tuo compito, specificando il modello e il tokenizer che hai caricato: |
|
|
| ```py |
| >>> from transformers import pipeline |
| |
| >>> generator = pipeline(task="text-generation", model=model, tokenizer=tokenizer) |
| ``` |
|
|
| Inserisci il testo di input nella [`pipeline`] per generare del testo: |
|
|
| ```py |
| >>> generator( |
| ... "Three Rings for the Elven-kings under the sky, Seven for the Dwarf-lords in their halls of stone" |
| ... ) # doctest: +SKIP |
| [{'generated_text': 'Three Rings for the Elven-kings under the sky, Seven for the Dwarf-lords in their halls of stone, Seven for the Dragon-lords (for them to rule in a world ruled by their rulers, and all who live within the realm'}] |
| ``` |
|
|
| ## Audio pipeline |
|
|
| La flessibilità della [`pipeline`] fa si che possa essere estesa ad attività sugli audio. |
|
|
| Per esempio, classifichiamo le emozioni in questo clip audio: |
|
|
| ```py |
| >>> from datasets import load_dataset |
| >>> import torch |
| |
| >>> torch.manual_seed(42) # doctest: +IGNORE_RESULT |
| >>> ds = load_dataset("hf-internal-testing/librispeech_asr_demo", "clean", split="validation") |
| >>> audio_file = ds[0]["audio"]["path"] |
| ``` |
|
|
| Trova un modello per la [classificazione audio](https://huggingface.co/models?pipeline_tag=audio-classification) sul Model Hub per eseguire un compito di riconoscimento automatico delle emozioni e caricalo nella [`pipeline`]: |
|
|
| ```py |
| >>> from transformers import pipeline |
| |
| >>> audio_classifier = pipeline( |
| ... task="audio-classification", model="ehcalabres/wav2vec2-lg-xlsr-en-speech-emotion-recognition" |
| ... ) |
| ``` |
|
|
| Inserisci il file audio nella [`pipeline`]: |
|
|
| ```py |
| >>> preds = audio_classifier(audio_file) |
| >>> preds = [{"score": round(pred["score"], 4), "label": pred["label"]} for pred in preds] |
| >>> preds |
| [{'score': 0.1315, 'label': 'calm'}, {'score': 0.1307, 'label': 'neutral'}, {'score': 0.1274, 'label': 'sad'}, {'score': 0.1261, 'label': 'fearful'}, {'score': 0.1242, 'label': 'happy'}] |
| ``` |
|
|
| ## Vision pipeline |
|
|
| Infine, usare la [`pipeline`] per le attività sulle immagini è praticamente la stessa cosa. |
|
|
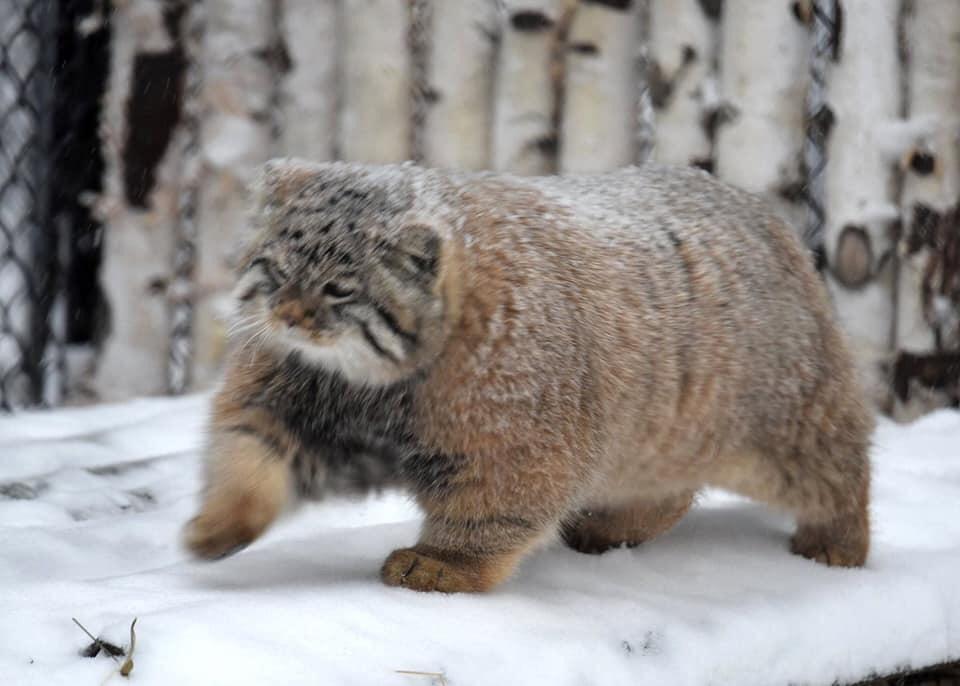
| Specifica la tua attività e inserisci l'immagine nel classificatore. L'immagine può essere sia un link che un percorso sul tuo pc in locale. Per esempio, quale specie di gatto è raffigurata qui sotto? |
|
|
|  |
|
|
| ```py |
| >>> from transformers import pipeline |
| |
| >>> vision_classifier = pipeline(task="image-classification") |
| >>> preds = vision_classifier( |
| ... images="https://huggingface.co/datasets/huggingface/documentation-images/resolve/main/pipeline-cat-chonk.jpeg" |
| ... ) |
| >>> preds = [{"score": round(pred["score"], 4), "label": pred["label"]} for pred in preds] |
| >>> preds |
| [{'score': 0.4335, 'label': 'lynx, catamount'}, {'score': 0.0348, 'label': 'cougar, puma, catamount, mountain lion, painter, panther, Felis concolor'}, {'score': 0.0324, 'label': 'snow leopard, ounce, Panthera uncia'}, {'score': 0.0239, 'label': 'Egyptian cat'}, {'score': 0.0229, 'label': 'tiger cat'}] |
| ``` |
|
|

